Getting started with the iOS SDK
Sample App
The easiest way to get started is to download our sample app and start making any necessary changes.
When you download the sample app, you'll get a fully-functional project that integrates the SDK, and you can begin modifying it as needed. It is also a good reference if you're adding the SDK to an existing app and need to see which specific build settings are required for linking to the library.
Set your Application API Key
The Sample iPhone app project will get you started quickly using the SDK. When you open the XCode project, all you need to do is fill in your Application API Key in LQConfig.h, which you can get from our developer site. For security reasons, you should leave LQ_APISecret as an empty string.
![]()
After you build the project, you should see the sample app in the simulator.
![]()
You can choose the "adaptive" mode to start tracking in background mode which will conserve as much battery power as possible.
If you choose "logging" mode, you will record much more data and it will be sent to the server in batches.
After the phone or simulator has located its position, you can press the "Get Location" button which will make an API request to the Geoloqi API and retrieve information about the current location.
Take a look at the source code to see some examples of making API requests from within the app.
Adding the SDK to an Existing Project
If you are adding the Geoloqi SDK to an existing iPhone app, follow the steps below.
Add the library to your project
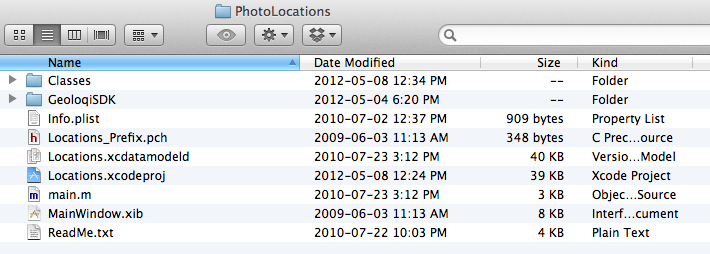
Copy the GeoloqiSDK folder, including libGeoloqi-Debug.a, libGeoloqi-Release.a, and the *.h files, to your project's folder. You can do this outside of XCode, since you will be linking it to XCode in the next step. Your project folder should look something like the following.
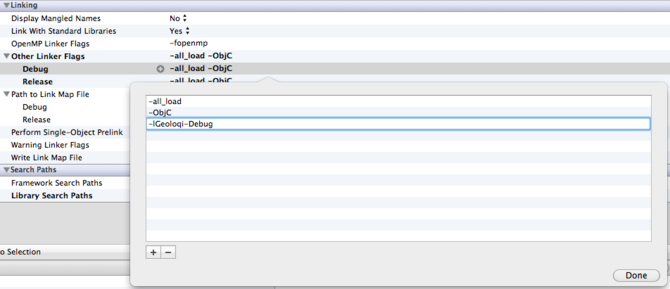
Add a linker flag to link your project with the libraries.
Add the GeoloqiSDK folder to your library and header search paths. You should enter "$(SRCROOT)/GeoloqiSDK" in the field, and it will automatically expand to the full path like in the screenshot.

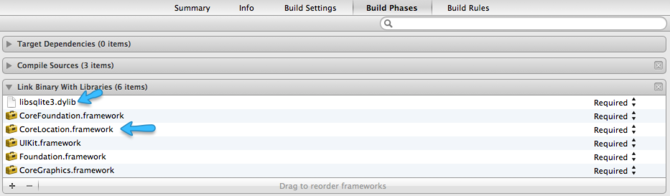
Add the required frameworks to your project.
- CoreLocation.framework
- libsqlite3.dylib
The SDK relies on JSONKit, since the iPhone's native JSON was only added in iOS 5, so you'll also need to add it to your project. If you are not already using JSONKit, you can simply drag the JSONKit folder from the sample project into your XCode project. It should just be the two JSONKit.h and JSONKit.m files.
Set up your App Delegate
Add the #import lines to any files that need to reference the LQSession or LQTracker class, or just add them to your App Delegate header file.
#import "LQSession.h"
#import "LQTracker.h"
Add these to your application:didFinishLaunchingWithOptions: method.
- (BOOL)application:(UIApplication *)application didFinishLaunchingWithOptions:(NSDictionary *)launchOptions
{
    // Sets your API Key. Provide an empty string as the secret.
    [LQSession setAPIKey:@"Your API Key" secret:@""];

    // Tell the SDK the app finished launching so it can properly handle push notifications, etc
    [LQSession application:application didFinishLaunchingWithOptions:launchOptions];

    // ...
}
Handle Push Notification Registration
Add these methods to your app delegate
- (void)application:(UIApplication *)application didRegisterForRemoteNotificationsWithDeviceToken:(NSData *)deviceToken;
{
  // For push notification support, we need to get the push token from UIApplication via this method.
  // If you like, you can be notified when the relevant web service call to the Geoloqi API succeeds.
  [LQSession registerDeviceToken:deviceToken withMode:LQPushNotificationModeDev];

  // When you're ready to publish your project to the app store, you should switch to "live" push mode.
  // [LQSession registerDeviceToken:deviceToken withMode:LQPushNotificationModeLive];
}

- (void)application:(UIApplication *)application didFailToRegisterForRemoteNotificationsWithError:(NSError *)error;
{
    [LQSession handleDidFailToRegisterForRemoteNotifications:error];
}

/**
 * This is called when a push notification is received if the app is running in the foreground. If the app was in the
 * background when the push was received, this will be run as soon as the app is brought to the foreground by tapping the notification.
 * The SDK will also call this method in application:didFinishLaunchingWithOptions: if the app was launched because of a push notification.
 */
- (void)application:(UIApplication *)application didReceiveRemoteNotification:(NSDictionary *)userInfo {
    [LQSession handlePush:userInfo];
}
Tracking Modes
To change tracking modes:
objectivec
[[LQTracker sharedTracker] setProfile:LQTrackerProfileAdaptive];
Other values for profiles are: LQTrackerProfileOff, LQTrackerProfileAdaptive, LQTrackerProfileRealtime and LQTrackerProfileLogging.
Handling User Authentication
The LQSession class is designed to give you flexibility in how you handle user accounts in your iPhone app. There are
two primary ways of having the SDK handle users.
- The SDK can automatically and silently create a user account when the app first launches, and will always restore that account the next time the app starts.
- You can explicitly have users sign up, and have them log back in with a username/password
Which you do depends largely on the kind of application you are writing, and whether you have an existing database of user accounts or not.
Automatically creating user accounts
To automatically create user accounts when users open your app, add the following to your app delegate after setting the API Key:
// If a user account has already been created, this will resume the tracker in the last state
// it was left in when the app last quit.
if([LQSession savedSession]) {
    // Call [LQTracker sharedTracker] which will cause it to resume tracking in the previous state
    [LQTracker sharedTracker];
    // Re-register for push notifications so we tell the server the user is still using the app
    [LQSession registerForPushNotificationsWithCallback:NULL];
} else {
    // Create a new anonymous account. You can pass an NSDictionary with custom user info if you wish
    [LQSession createAnonymousUserAccountWithUserInfo:nil completion:^(LQSession *session, NSError *error) {
        if(error) {
            NSLog(@"ERROR: Failed to create account: %@", error);
        } else {
            // Save the session to disk so it will be restored on next launch
            [LQSession setSavedSession:session];

            // Now register for push notifications
            // After the user approves, the app delegate method didRegisterForRemoteNotificationsWithDeviceToken will be called
            [LQSession registerForPushNotificationsWithCallback:^(NSData *deviceToken, NSError *error) {
                if(error){
                    NSLog(@"Failed to register for push notifications: %@", error);
                } else {
                    NSLog(@"Got a push token! %@", deviceToken);
                }
            }];

            // Start tracking
            [[LQTracker sharedTracker] setProfile:LQTrackerProfileAdaptive];

            // Note: You may not want to start tracking right here, and you may not want to register for push notifications now either.
            // You are better off putting off these until you absolutely need to, since they will show a popup prompt to the user.
            // It is somewhat annoying to see two prompts in a row before even getting a chance to use the app, so you should wait
            // until you need to show a map or until the user turns "on" some functionality before prompting for location access
            // and push notification permission.
        }
    }];
}
The next time your app launches, it will use the previous account and begin tracking in "adaptive" mode automatically.
Explicitly creating accounts and signing in
You can create an account with a username and password by using this method of LQSession
[LQSession createAccountWithUsername:self.usernameField.text
                            password:self.passwordField.text
                               extra:nil
                          completion:^(LQSession *session, NSError *error) {

                              if(session.accessToken) {
                                  NSLog(@"Logged in successfully! %@", session.accessToken);

                                  // Save the session so it will be restored next time
                                  [LQSession setSavedSession:session];

                                  // Register for push notifications which will show the prompt now
                                  [self registerForPushNotifications];

                                  // Start tracking location in "adaptive" mode, which will show the location prompt
                                  [[LQTracker sharedTracker] setProfile:LQTrackerProfileAdaptive];

                                  // Post a notification so your UI can show the appropriate view
                                  [[NSNotificationCenter defaultCenter] postNotificationName:LQAuthenticationSucceededNotification
                                                                                      object:nil
                                                                                    userInfo:nil];
                              } else {
                                  // Failed login
                                  NSLog(@"Error logging in %@", error);
                                  [[[UIAlertView alloc] initWithTitle:@"Error" message:[error.userInfo objectForKey:@"error_description"] delegate:nil cancelButtonTitle:nil otherButtonTitles:@"Ok", nil] show];
                              }
}];
You can log a user back in by creating a sign-in form and running this method of LQSession
[LQSession requestSessionWithUsername:self.usernameField.text
                             password:self.passwordField.text
                           completion:^(LQSession *session, NSError *error){
                                 if(session.accessToken) {
                                  NSLog(@"Logged in successfully! %@", session.accessToken);

                                  // Save the session so it will be restored next time
                                  [LQSession setSavedSession:session];

                                  // Register for push notifications which will show the prompt now
                                  [self registerForPushNotifications];

                                  // Start tracking location in "adaptive" mode, which will show the location prompt
                                  [[LQTracker sharedTracker] setProfile:LQTrackerProfileAdaptive];

                                  // Post a notification so your UI can show the appropriate view
                                  [[NSNotificationCenter defaultCenter] postNotificationName:LQAuthenticationSucceededNotification
                                                                                      object:nil
                                                                                    userInfo:nil];
                                 } else {
                                     // Failed login
                                     NSLog(@"Error logging in %@", error);
                                     // Display an alert about the error, probably you want to do something different
                                     [[[UIAlertView alloc] initWithTitle:@"Error" message:[error.userInfo objectForKey:@"error_description"] delegate:nil cancelButtonTitle:nil otherButtonTitles:@"Ok", nil] show];
                                 }
                             }];
If you've included the notification code in the sign-in and sign-up methods, you can listen for this notification and the following method will be called when a user signs in successfully.
    // Add this to your application:didFinishLaunchingWithOptions: method

    // You may wish to listen for the notification the SDK sends when a user has logged in successfully
    [[NSNotificationCenter defaultCenter] addObserver:self
                                             selector:@selector(authenticationDidSucceed:)
                                                 name:LQAuthenticationSucceededNotification
                                               object:nil];


- (void)authenticationDidSucceed:(NSNotificationCenter *)notification
{
    // You can dismiss your login screen here, or have some other indication the login was successful
    // ...
}